Installation
Rocksmarker installation guide
This guide outlines the step-by-step process for installing Rocksmarker.
You will configure Neovim, prepare the Lua 5.1 environment, and apply
Rocksmarker settings.
Each step ensures proper setup, performance optimization, and
smooth integration with your development environment. By the end, you will
have a fully operational Rocksmarker instance ready for advanced editing and
plugin management.
Prerequisites
-
System requirements
-
Operating system
Rocky Linux (or a compatible distribution such as RHEL or CentOS, Fedora) -
Administrative permissions
Required to install Neovim and the required packages and configure Lua 5.1 -
Enable CRB repository (for
ninja-build):sudo dnf config-manager --set-enabled crb -
Packages
Install the following packages:sudo dnf install -y epel-release yum-utils npm ncurses readline-devel icu ninja-build cmake gcc make unzip gettext curl glibc-gconv-extra tar git
About CRB
Red Hat's CodeReady Builder (CRB) repository provides additional development
tools, libraries, and dependencies for Red Hat Enterprise Linux (RHEL) and
compatible distributions.
Designed to complement the base RHEL repositories, CRB offers open source
packages commonly required for software development, debugging, and system
administration.
Install Neovim from source
To achieve the best performance and compatibility with Rocksmarker,
compile Neovim from source. This method guarantees access to the
recentest features, performance optimizations, and complete plugin support
for Tree-sitter and LSP.
The result is a system-optimized Neovim installation that aligns with
Rocksmarker's requirements.
Clone the Neovim repository
Retrieve the latest Neovim source code from GitHub:
git clone https://github.com/neovim/neovim
cd neovim/
Select the stable branch
Switch to the stable branch for a production-ready release:
git checkout stable
Compile with optimization
Build Neovim using make with Release optimizations for performance:
make CMAKE_BUILD_TYPE=Release
Install system-wide
Install the compiled binary to the system:
sudo make install
This process ensures a clean, optimized Neovim installation from source.
Using stable release
When compiling Neovim from source, check out the stable branch
(git checkout stable) to build version 0.11 or later.
Omitting this step defaults to the development branch (0.12+), which might
contain unfinished or experimental features.
Install Lua 5.1
Lua Version Requirement
Rocksmarker mandates Lua 5.1 as the default runtime for rocks.nvim
to ensure full compatibility and operational stability. This version
alignment guarantees optimal performance, reliable plugin execution, and
seamless interaction with Neovim's core systems.
Using Lua 5.1 eliminates version conflicts and provides the foundation for
Rocksmarker's dependency management and feature set.
Download Lua 5.1 source
Fetch the Lua 5.1.5 source archive:
curl -O https://www.lua.org/ftp/lua-5.1.5.tar.gz
Extract the archive
Unpack the downloaded source:
tar xzf lua-5.1.5.tar.gz
cd lua-5.1.5
Compile and test
Build Lua 5.1 and run tests to verify functionality:
make linux test
Install system-wide
Install Lua 5.1 to the default system location:
sudo make install
This completes the installation of Lua 5.1, providing the required runtime for Neovim plugins and scripting.
Installation path
This will install Lua 5.1 to /usr/local/bin and its headers to /usr/local/include.
Configure Lua 5.1 for rocks.nvim
This configuration isolates rocks.nvim from system-wide Lua
installations, guaranteeing plugin stability, consistent dependency resolution
through Luarocks, and predictable behavior.
Omitting this step risks plugin loading issues and inconsistent
performance. Proper setup ensures Rocksmarker operates as intended.
Add Lua alias to .bashrc
Append an alias for Lua 5.1 to the shell configuration:
echo "alias lua='/usr/local/bin/lua'" >> ~/.bashrc
Reload .bashrc
Apply the updated configuration:
. ~/.bashrc
Verify Lua installation
Confirm the installed Lua version:
lua -v
Expected output
Lua 5.1.5 Copyright (C) 1994-2012 Lua.org, PUC-Rio
Lua 5.1 header symlinks
When installing Lua 5.1 for use with rocks.nvim and Rocksmarker,
linking the Lua headers is essential because Luarocks requires access to these
header files during the compilation and installation of Lua modules.
The headers contain definitions and declarations necessary for building native Lua extensions and ensuring compatibility between Lua and the system libraries.
Navigate to system include
Move to the system headers location:
cd /usr/include/
Create and symlink
Create a symbolic link
cd /usr/include/ sudo mkdir lua && cd lua sudo ln -s /usr/local/include/ 5.1
Establish a directory for Lua headers and link to the installed version:
sudo mkdir lua && cd lua
sudo ln -s /usr/local/include/ 5.1
This ensures the system can locate Lua 5.1 headers during compilation, enabling compatibility with Neovim and other Lua-dependent applications.
Download configuration
Rocksmarker provides two distinct setup configurations, tailored to your workflow needs:
Primary Neovim Environment
Replace your existing Neovim configuration with Rocksmarker, making it your default editing environment. This approach is ideal for users who want a fully integrated, production-ready setup with all features enabled out of the box.
Isolated Testing Configuration
Install Rocksmarker as a standalone configuration, keeping your current Neovim setup intact. This option is perfect for evaluation, development, or experimentation without affecting your main workflow.
Both methods ensure a seamless experience, whether you seek a permanent upgrade or a sandboxed trial. Choose based on your preference for stability or flexibility.
Use this option if you want Rocksmarker to be your default Neovim configuration for daily use.
git clone https://github.com/ambaradan/rocksmarker.git ~/.config/nvim
nvim
Use this option if you want to test Rocksmarker without affecting your current Neovim setup.
git clone https://github.com/ambaradan/rocksmarker.git ~/.config/rocksmarker/
NVIM_APPNAME=rocksmarker nvim
This starts Neovim by using the Rocksmarker configuration, leaving your main setup unchanged.
Create an alias for easier access:
echo "alias rocksmarker='NVIM_APPNAME=rocksmarker nvim'" >> ~/.bashrc
. ~/.bashrc
Install the configuration
- Launch Neovim
- For the main editor run
nvim
For the secondary editor, useNVIM_APPNAME=rocksmarker nvim - Rocks.nvim installation
- A bootstrap script will automatically install the
rocks.nvimplugin manager. -

Installing rocks.nvim
- Synchronize plugins
- Follow the instructions on the screen and accept the synchronization of all plugins.
-
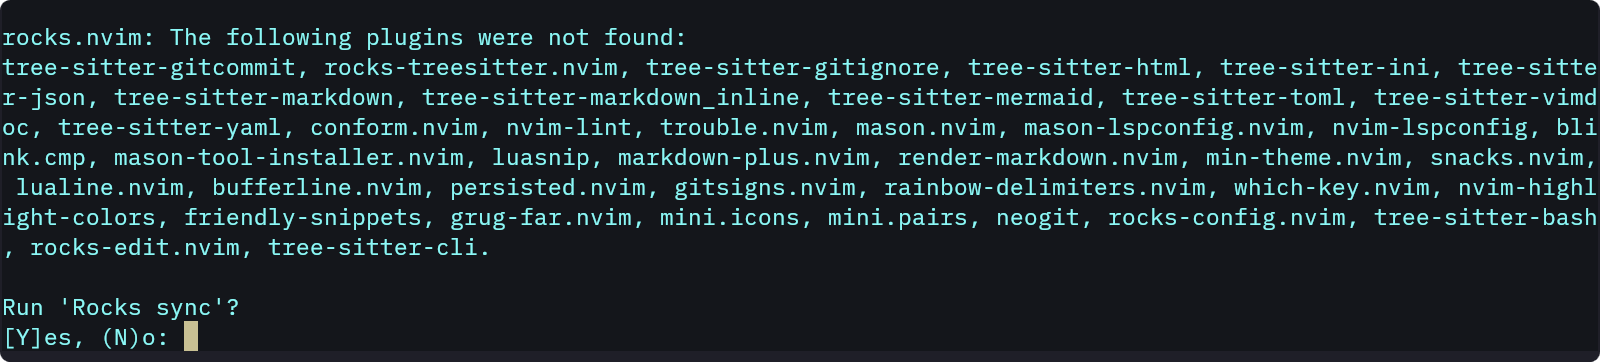
Installing plugins
-
Plugins path
Plugins install to:
.local/share/nvim/rocks/lib/luarocks/rocks-5.1/ - Restart Neovim
- Close and reopen Neovim to load the new configurations.
Automatic LSP installation
On the second startup, the mason-lspconfig and mason-tool-installer
plugins will automatically install all necessary language servers, linters
and formatters.
Troubleshooting
- Logs: If you meet issues, check the installation logs with
:Rocks log. - Dependencies: Install all required system dependencies, such as git, curl, and gcc.
- Lua Version: Ensure Lua 5.1 is the default version to keep compatibility
with
rocks.nvim.
Next steps
- Verify installation: Open a Markdown file or run
:checkhealthto ensure everything is working correctly. - Start using Rocksmarker: Your environment is now ready for Markdown editing, coding, or any other task.
Conclusion
You have successfully installed Rocksmarker. This setup provides a powerful and efficient environment for writing and managing Markdown documentation in Neovim.
If you meet any issues, see the Rocksmarker GitHub repository for further help.
Happy coding 🚀